Skip to Main Content

Flurry of Fall Foliage

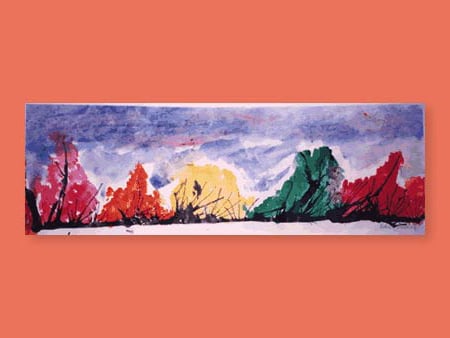
The art of wet-on-wet watercolor will help students create an autumn image as they learn about the fall foliage.

Lesson Plan

Supplies Needed

Gather all the supplies needed to bring your craft ideas to life! From paints and markers to glue and scissors, our crafts section has everything to spark creativity and make every project truly special.

  • Paper
  • Straw(s)

Steps

  • Step 1

    Photosynthesis is the process by which plants make their own food. Have students learn about how the plant uses a green chemical called chlorophyll to capture the sun's energy and convert carbon dioxide into glucose. Ask them to find out how the shorter days of fall with less sunlight affect the colors of the leaves. Do they actually turn other colors, or were the red, orange, yellow, and other colors underneath all along and are now visible?

  • Step 2

    Have students create a fall foliage picture using the wet-on-wet watercolor technique, which is used to create soft edges, shadowy features, soft and flowy landscapes, and other effects. To begin they will lightly wet a piece of paper using a spray bottle or a paintbrush dipped in water. The paper should be evenly saturated but not soaking wet. Next they will apply a layer of black or brown watercolor near the bottom of the paper, then use a straw to blow the paint upward to create tree trunks and branches. Alternatively, they could use a thin paintbrush dipped in water to guide the black paint upward.

  • Step 3

    Next have them fill in the background with watercolors using a variety of blue, purple, and pink hues for the sky and red, yellow, orange, and purple hues for the leaves on the trees.

  • Step 4

    When the paintings are dry, have students present them and discuss some fun facts they learned about fall.

Standards

ARTS: Explore and invent art-making techniques and approaches.

SCI: Construct an argument that plants and animals have internal and external structures that function to support survival, growth, behavior, and reproduction.

Adaptations

Students can paint with chlorophyll. Have them outline a tree trunk and branches on a piece of white paper. Then have them bunch up a couple of green leaves and use them to color leaves onto the branches. They can either press firmly with the leaves in their hands or use a solid object such as a metal spoon to press and move the leaves on the page.

Ask students to diagram and label a tree or plant's growth. For example, they might draw roots, stem or trunk, leaves, and sun and label each area with the process that occurs. The roots form underground, a stem or trunk grows above ground, the leaves absorb energy from the sun to turn chlorophyll into food, etc.