Skip to Main Content

Textured Tiles

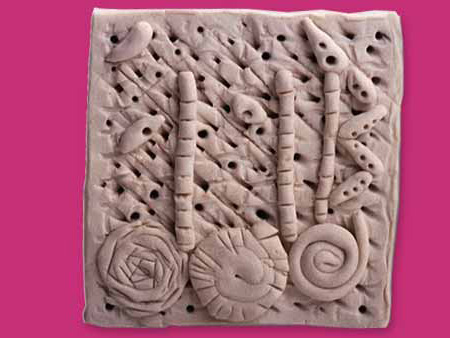
Students will explore textures and create a textured tile using Air-Dry Clay.

Lesson Plan

Supplies Needed

Gather all the supplies needed to bring your craft ideas to life! From paints and markers to glue and scissors, our crafts section has everything to spark creativity and make every project truly special.

Steps

  • Step 1

    Have students think of various textures around them. These may include animal fur, bird feathers, sandpaper, tree bark, cotton balls, etc. Ask them to think of adjectives that describe these items, such as fluffy, coarse, rough, or soft. 

  • Step 2

    Ask children to create a textured tile out of Air-Dry Clay. They can form the clay into a square slab and then use a variety of utensils such as forks, spoons, toothpicks, etc. to texture it. They can shape additional pieces of clay to press onto the square slab. These can be textured as well. The finished piece can be left in its original color or painted.

  • Step 3

    Have students present their tiles and describe how they created the interesting textures that adorn the piece. The class can display the tiles in an assembled mosaic arrangement.

Standards

ARTS: Explore and invent art-making techniques and approaches.

LA: Use adjectives and adverbs and choose between them depending on what is to be modified.

Adaptations

Place a textured item, such as a pine cone, small stuffed animal, baseball, bubble wrap, or anything else, into a bag. Have students reach into the bag and feel  the item without looking at it. Then ask them to describe the texture of the item and create a sketch of what they think they felt.

Challenge students to create a drawing that gives the illusion of texture. They could experiment with various art techniques such as hatching, cross hatching, color shading, or anything else.