Skip to Main Content

Tiki Masks

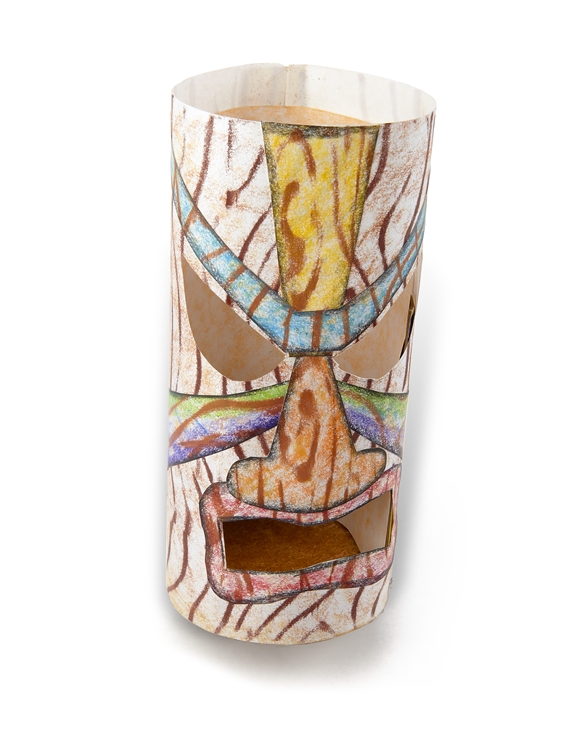
The beauty and traditions of Hawaii and Polynesia will inspire students to create replicas of Tiki masks using a rubbing plate to create the look of wood grain.

Lesson Plan

Supplies Needed

Gather all the supplies needed to bring your craft ideas to life! From paints and markers to glue and scissors, our crafts section has everything to spark creativity and make every project truly special.

  • Color Sticks Colored Pencils
  • Heavy Paper
  • Recycled Cardboard
  • Recycled Cardboard Snack Cylinder

Steps

  • Step 1

    Tiki masks were first created by the Maori tribe of New Zealand and originally used in ancient Polynesian and Hawaiian culture. They are hand carved out of wood and their meanings and symbolism have evolved over the years. Have students look at images of some of these masks and research their history and meanings. Who are some of the deities they may represent? How are they used? Who might wear them? Why might they be displayed?

  • Step 2

    Students will create a rubbing plate to produce the look of wood grain. To do this have them draw with glue on a piece of cardboard and make wood grain lines and patterns. While the glue is drying they can work on the next step.

  • Step 3

    Have students cut away the front part of a cardboard canister, such as an oatmeal container, leaving the base intact. This cut should be aligned with where they mask eyes and mouth will be.

  • Step 4

    Now have students decorate paper using their rubbing plates. They can start with white, beige, or brown paper. Ask them to place the rubbing plate under the paper and use the side of a Color Stick or crayon to rub over it, which will give the paper a textured wood-grain look. They may want to use multiple colors layered on the paper for an authentic wood grain appearance. After the wood grain is drawn all over the paper, students will sketch a mask with facial features and add bolder colors to those areas. Have them cut out holes for the eyes and mouth, then decorate the mask and facial features with traditional Polynesian designs.

  • Step 5

    Students will now wrap the decorated paper around the cardboard cylinder, making sure to place the eyes and mouth openings over the cut-out area.

  • Step 6

    Students will present their masks and discuss what they learned during group presentations.

Standards

ARTS: Explore and invent art-making techniques and approaches.

SS: Culture: Create, learn, share, and adapt to culture.

Adaptations

What is Polynesia? Have students find the region on a map and learn about some of the islands such as the Hawaiian Islands, the Cook Islands, Tonga, Easter Island, or any others (there are over 1,000!) that make up Polynesia. Ask them to investigate some facts about one or two of the locations.

Have students research Easter Island and the Rapa Nui, the indigenous Polynesian peoples who live there. When did they arrive there? What languages do they speak? Have them look at images and learn about the Moai, the human figures carved out of rock found throughout the region.