Skip to Main Content

Painting Perspective

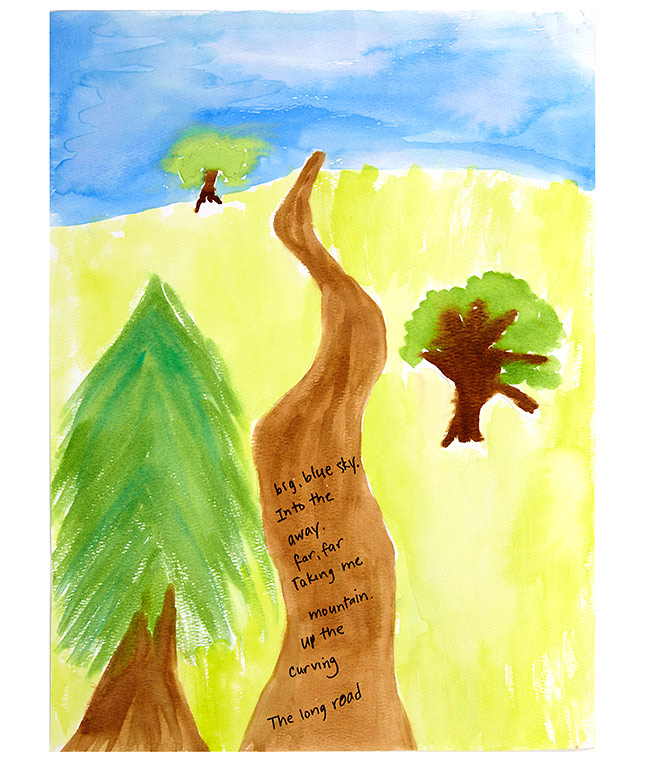
Students draw a river or road using one point perspective and add an original poem to complete this work.

Lesson Plan

Supplies Needed

Gather all the supplies needed to bring your craft ideas to life! From paints and markers to glue and scissors, our crafts section has everything to spark creativity and make every project truly special.

  • Apron/Smock
  • Container of Water
  • Paper Towels
  • Recycled Newspaper

Steps

  • Step 1

    Share a read aloud of Country Road by Robert San Souci, or another illustrated book that shows foreground, middle ground and background. As you are reading, ask students to point out where these three areas of perspective can be seen and what the differences are (foreground: large, bottom of page, bright and detailed; middle ground: not as big, less detail, middle of page; background is where the smallest objects are will the dullest color and least detail).

  • Step 2

    Provide each students with a piece of watercolor paper and a pencil. Students choose between Crayola Watercolors in pans, or Crayola Watercolor Pencils.

  • Step 3

    Demonstrate each step before students execute. Use a pencil to show the layout. Begin with drawing a horizon line on the top third of the paper. This line can be bumpy or straight, but students need to plan what the background will be, behind this line.

  • Step 4

    Next, select a vanishing point on the horizon line. Put a small dot there.

  • Step 5

    Draw an imaginary road. Starting at the dot, draw a line down to the very bottom of the paper. The lines can be curvy, straight, or zig-zag as the student wishes. This line is one side of the road. Draw the other side of the road, which gets wider as you reach the bottom of the paper.

  • Step 6

    Sketch a simple object next to the road at the bottom of the page. For example, try a large tree. Younger children can be encouraged to cut out a small, medium and large shape from construction paper.

  • Step 7

    On the other side of the road, further up the page, demonstrate for students how to draw (or paste) an identical object smaller than the first. Closer to the vanishing point, draw or cut one final smaller object. Remind students about the rules of perspective (see instruction one).

  • Step 8

    Once students are done planning out the page, they may begin painting with the watercolor paints in pans or watercolor pencils. Allow time for artwork to dry.

  • Step 9

    Students need to fill in all areas of the paper with color, except for the road. The road should be filled in with a poem about the environment the student has selected in their work. Provide students with black or brown markers to write their poems.

  • Step 10

    Provide time in the school day for students to share their work and reflect upon the creating experience: What elements did you use in your painting? How did you show perspective in your work?

Standards

LA: Produce clear and coherent writing in which the development, organization, and style are appropriate to task, purpose, and audience.

LA: Include multimedia components and visual displays in presentations to enhance the development of main ideas or themes.

VA: Apply visual organization strategies to design and produce a work of art.

VA: Select and use the qualities of structures and functions of art to improve communication of their ideas.

Adaptations

Write a descriptive story about paintings and instead of including a poem, write the first line of the story in the road.

Write a haiku in the road about a part of nature.

Use Crayola Oil Pastels, or Crayola Colored Pencils to complete this project.