Search
Create It Yourself logo
Art Supplies and Crafts surrounding Create it Yourself logo.

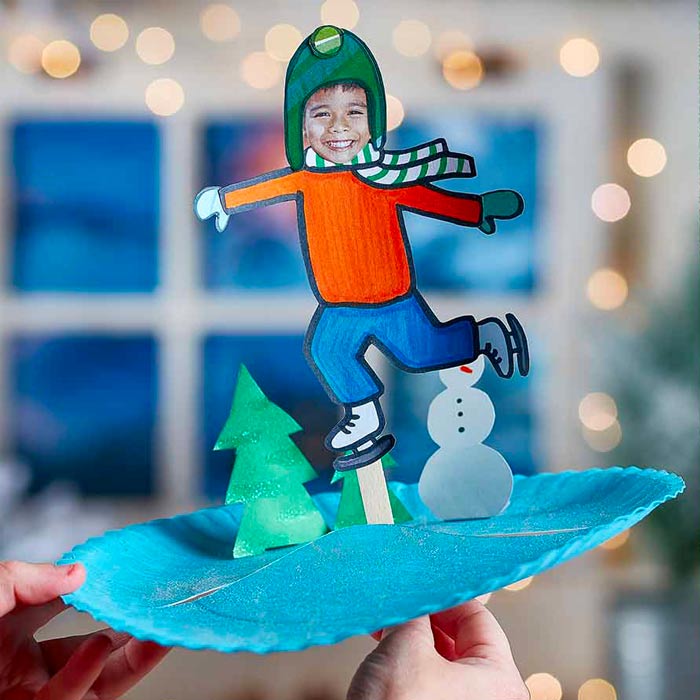
Paper Plate Ice Skater Stick Puppet

Paper_Plate_Ice_Skater_Stick_Puppet_Poster_frame
Loading Color Wheel

Plate & skate! Have an ice day & craft at home with this DIY paper plate craft for kids.

Steps:

Show Images
1
Paper-Plate-Ice-Skater-Stick-Puppet_Step-01

1 Cover plate in paint. Dry 1–2 hours. Add second coat. Dry 1–2 hours.

2
Paper-Plate-Ice-Skater-Stick-Puppet_Step-02

2 Squeeze glitter glue onto plate and spread with paint brush. Dry 1–2 hours.

3
Paper-Plate-Ice-Skater-Stick-Puppet_Step-03

3 Ask an adult to cut wave pattern in paper plate with craft knife.

4
Paper-Plate-Ice-Skater-Stick-Puppet_Step-04

4 Sketch skater’s body on plain cardstock with pencil.

5
Paper-Plate-Ice-Skater-Stick-Puppet_Step-05

5 Outline and color body with markers. Cut out.

6
Paper-Plate-Ice-Skater-Stick-Puppet_Step-06

6 Cut out child’s face from photo. Glue to body.

7
Paper-Plate-Ice-Skater-Stick-Puppet_Step-07

7 Sketch and cut out Bright Pop Cardstock winter accessories. Glue to body.

8
Paper-Plate-Ice-Skater-Stick-Puppet_Step-08

8 Glue skater to craft stick.

9
Paper-Plate-Ice-Skater-Stick-Puppet_Step-09

9 Sketch and cut out construction paper trees and snowman, leaving small tab at bottom.

10
Paper-Plate-Ice-Skater-Stick-Puppet_Step-10

10 Add details to trees and snowman with glitter glue and markers.

11
Paper-Plate-Ice-Skater-Stick-Puppet_Step-11

11 Fold bottom tabs and glue to paper plate. Let all glue steps dry 1–2 hours.

12
Paper-Plate-Ice-Skater-Stick-Puppet_Step-12

12 Gently place craft stick in wave pattern and glide your skater across the ice!

CIY Staff Tips:

  • This project uses a craft knife. Adult assistance required.